Integrations
How to Connect WhatsApp to ClickUp with ClickIntegrator
Click here to watch the video instead
Connecting your everyday messaging app—WhatsApp—to your project management tool—ClickUp—sounds like a productivity game changer, right? In this post, we’re going to walk through exactly how you can link your WhatsApp to ClickUp with the help of ClickIntegrator (sometimes called “ClickInfig” in the video transcript), so you can get instant notifications from your ClickUp spaces, folders, lists, tags and even goal updates directly to your WhatsApp.
This guide breaks down every step in simple terms. We’ve stuffed it with all the visuals, tips, options, and troubleshooting so you don’t just connect the two tools, you really own the workflow.
Why Connect WhatsApp to ClickUp?
Ever missed an update from your workspace because you weren’t glued to ClickUp all day? Linking WhatsApp lets you get those updates instantly on your phone, so you never miss when:
- A new folder is added.
- A list is created.
- Tags or goals are updated.
- Something changes in your project.
It’s super handy if you’re already a heavy WhatsApp user and just want to cut down on checking ten different apps every five minutes.
Visualization: Illustration showing WhatsApp and ClickUp icons connected by a notification “zap.”
What You Need Before You Start
Before you begin, make sure you have:
- A ClickUp account with admin or integration access.
- WhatsApp is installed and active on your smartphone.
- The ClickIntegrator plugin/app (if your workspace uses the integration).
- Your phone handy (for verification).
- About 5 minutes, uninterrupted.
Checklist image for setup prerequisites.
Step 1: Accessing the ClickIntegrator Settings
The very first thing you want to do is open your ClickUp workspace and find the settings for ClickIntegrator. Usually, this lives in the integrations or notifications section.
- Log into ClickUp.
- Navigate to your workspace integrations.
- Look for “ClickIntegrator” or “ClickInfig” in the options list.
Screenshot mockup showing the integrations settings in ClickUp, with ClickIntegrator highlighted.
Step 2: Starting the WhatsApp Connection Process
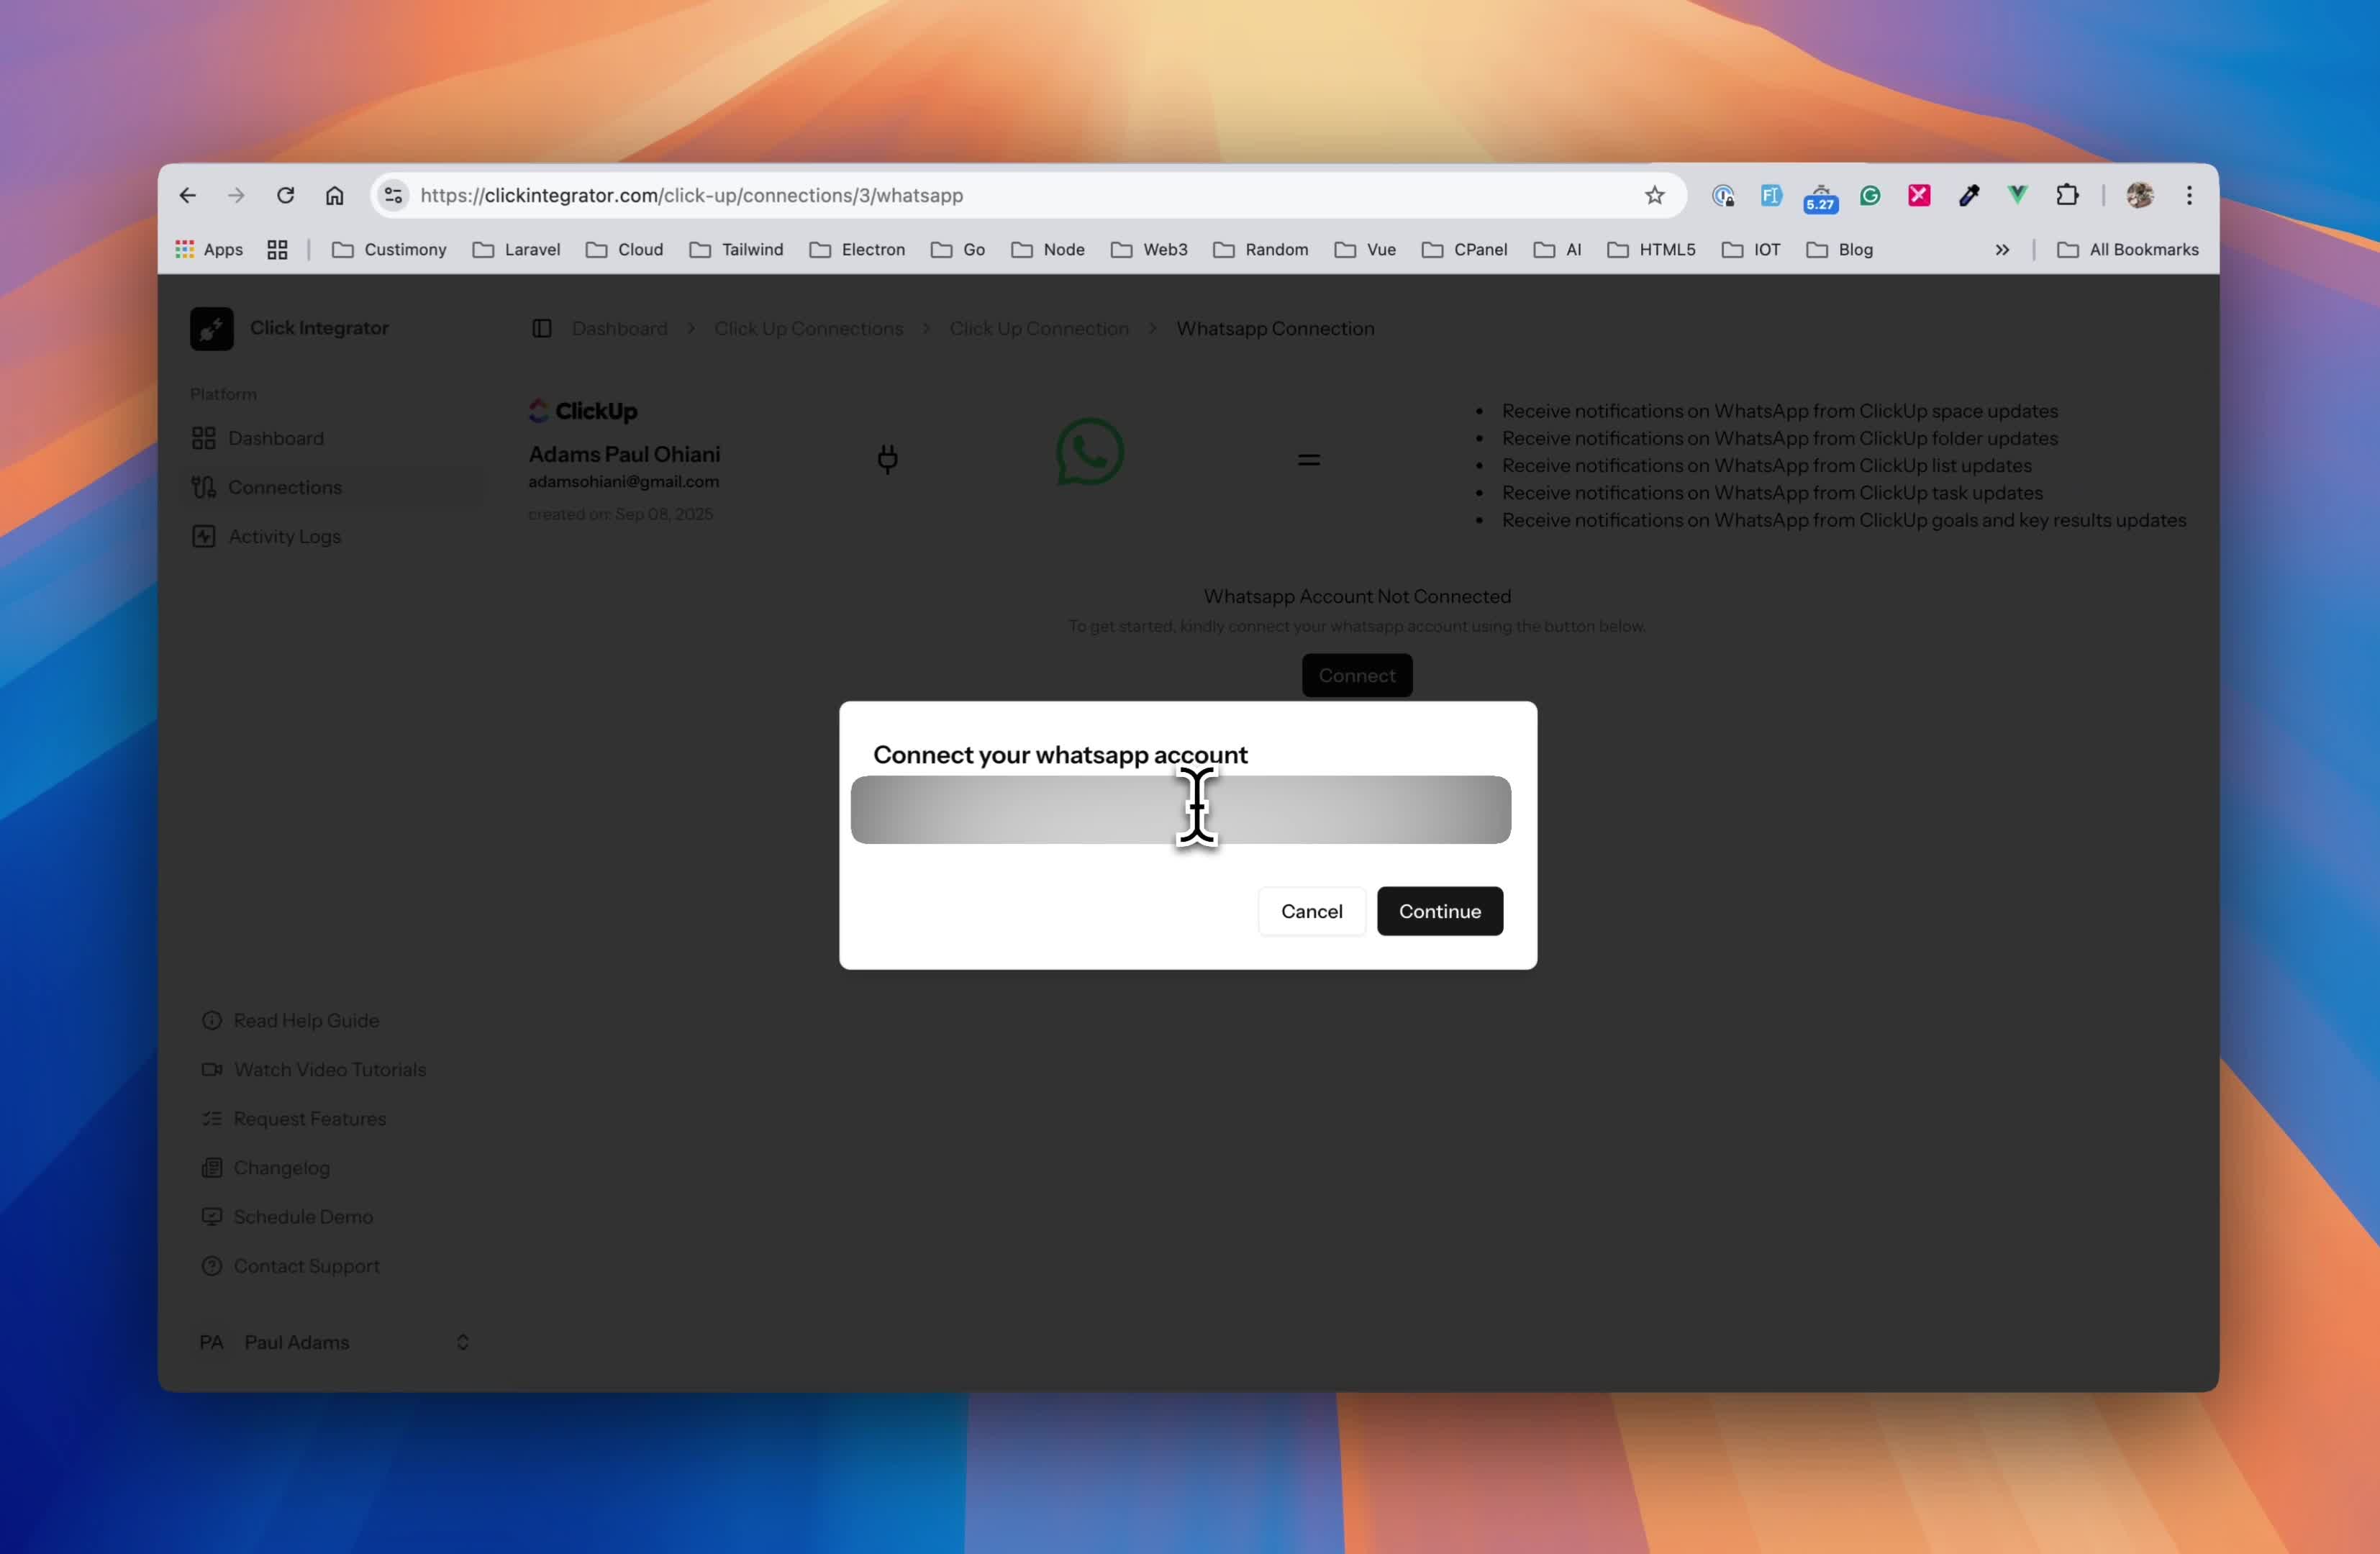
If you haven’t connected your WhatsApp yet, the panel will say “Not Connected”. There should be a big “Connect” button staring at you.
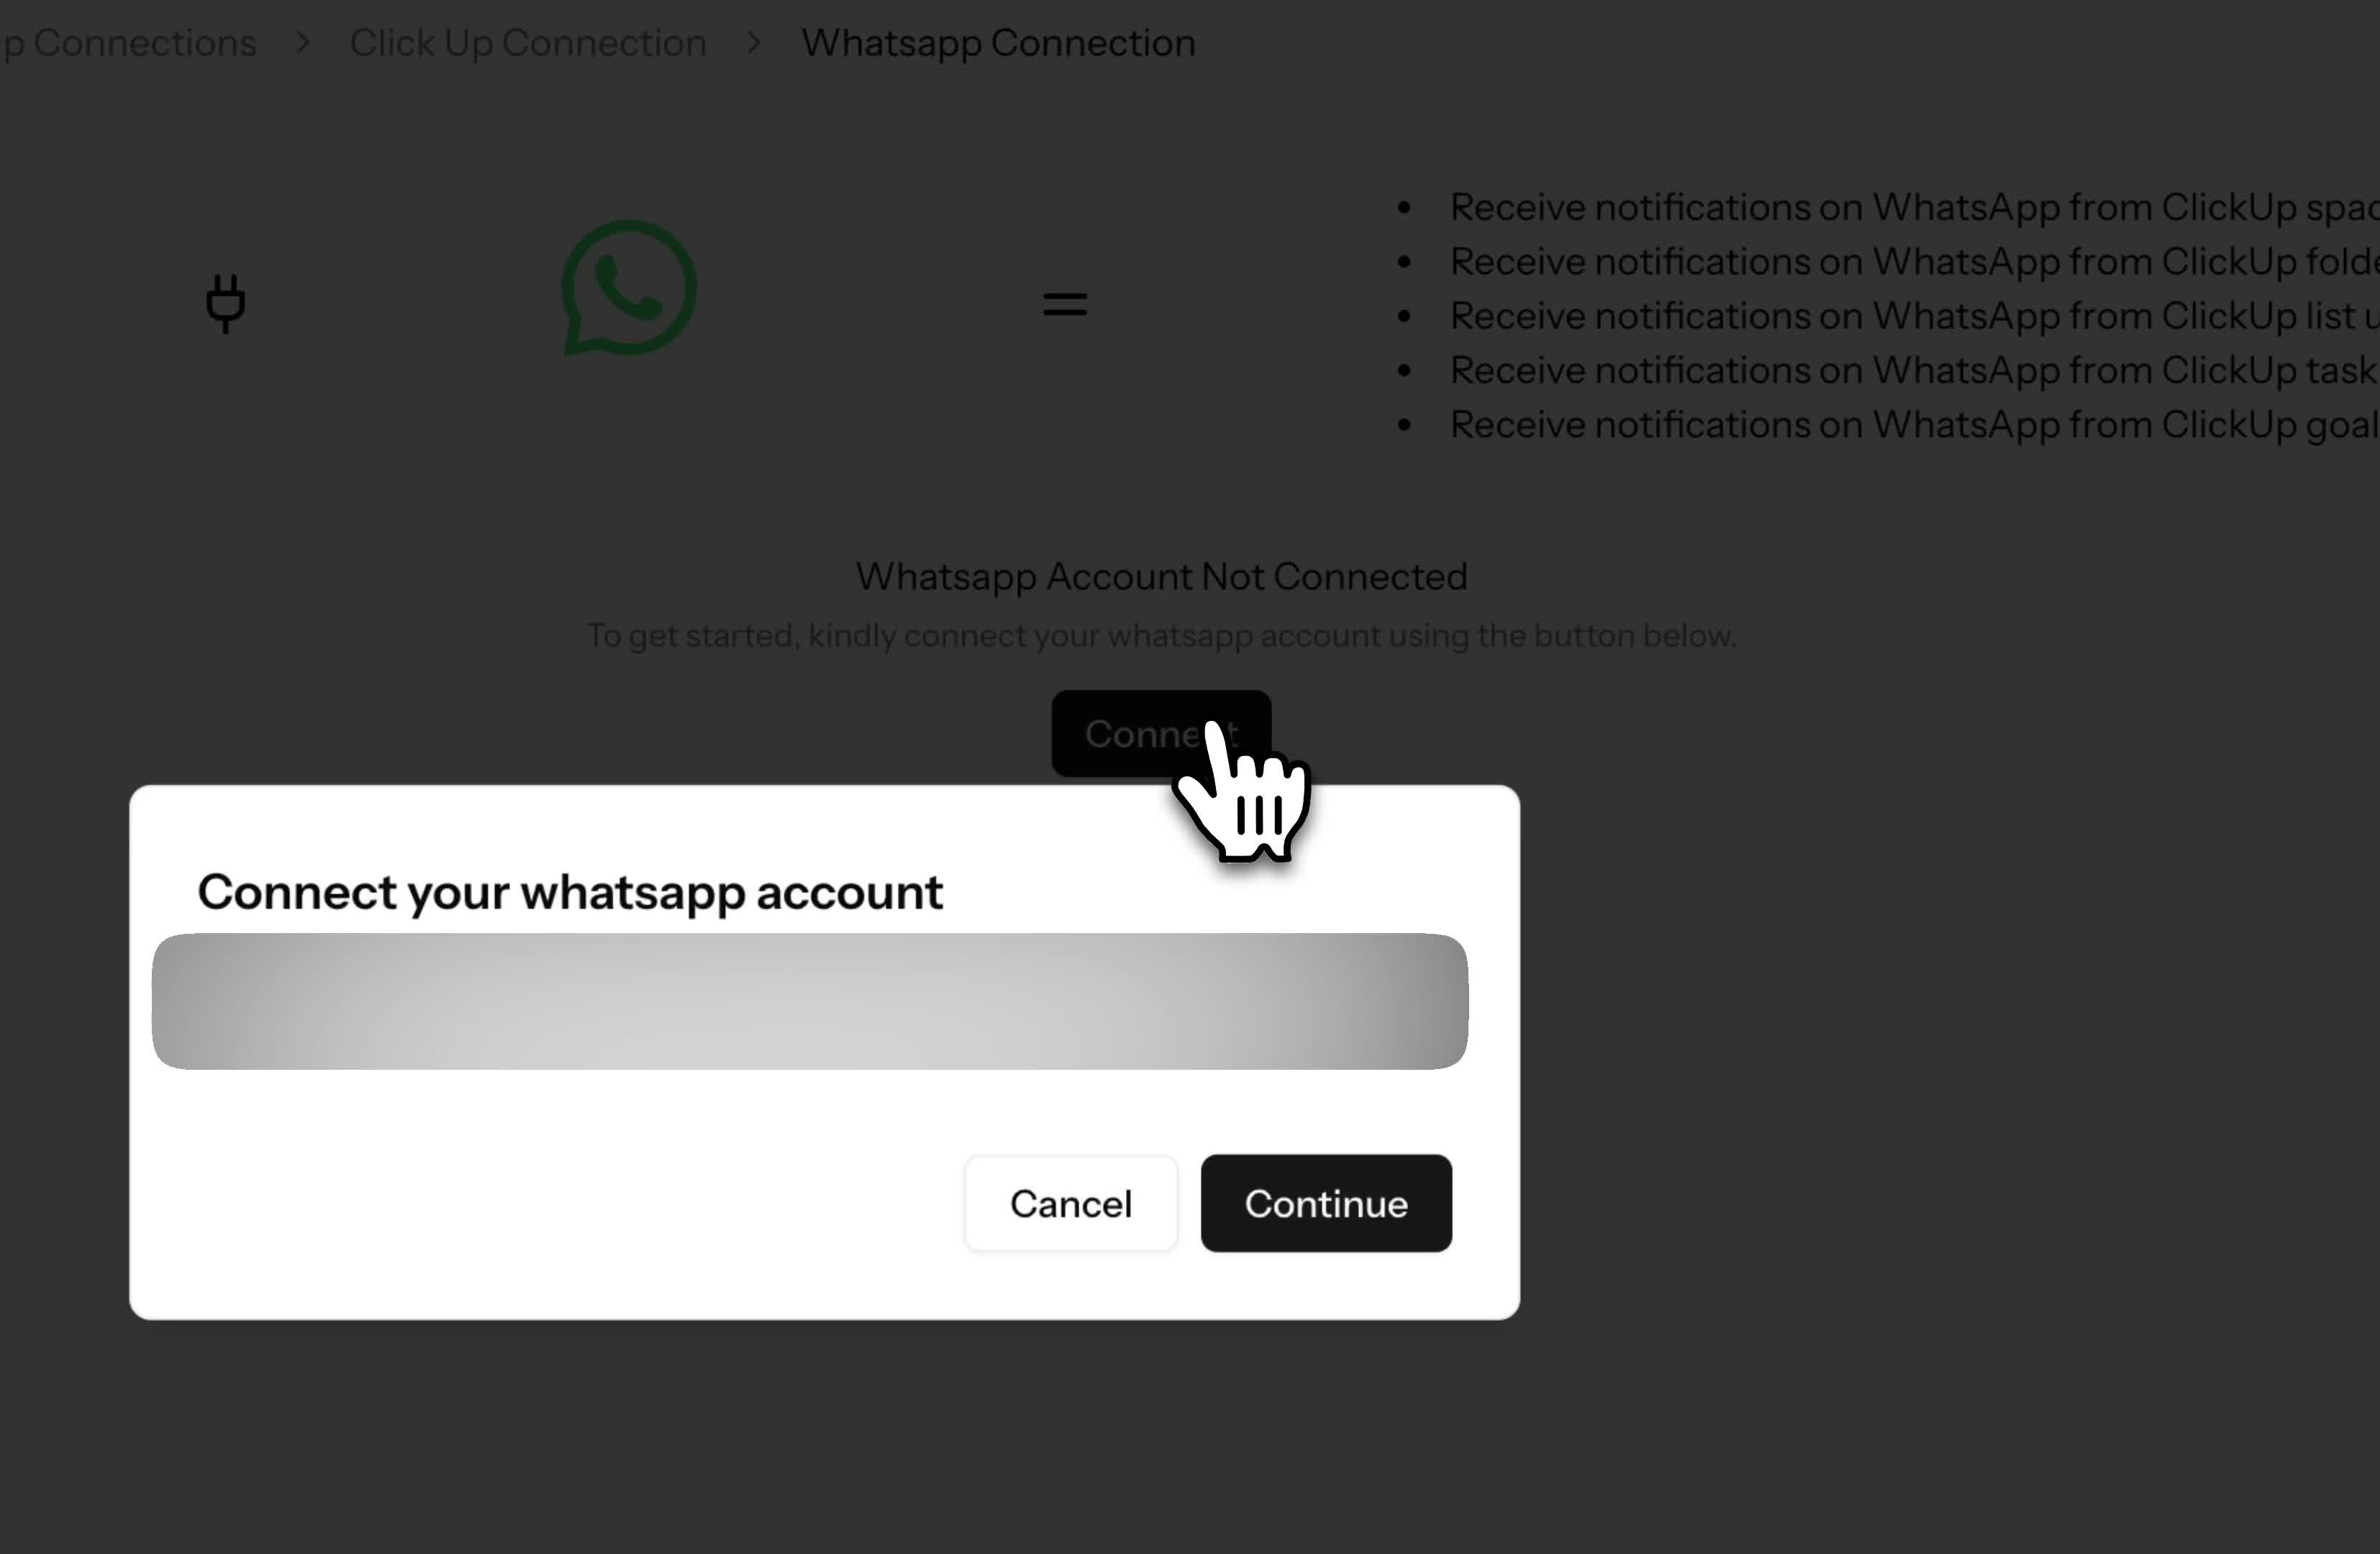
- Click that “Connect” button.
Right away, a new window pops up saying “No WhatsApp account connected.” Again, there’s a “Connect” button—press it!
Stepwise diagram of clicking “Connect” twice: once from ClickUp, once from the WhatsApp integration window.
Step 3: Entering Your WhatsApp Number
Next, you’ll be prompted to enter your WhatsApp phone number. Just type it in.
- Enter your country code (if it asks).
- Put your WhatsApp number in the box.
Double-check the number—you’ll need a verification code from WhatsApp in the next step.
Form mockup where user enters their WhatsApp number.
Step 4: Getting Your Verification Code from WhatsApp
Once you put in your number and hit continue, ClickIntegrator sends you a message on WhatsApp directly—super smooth!
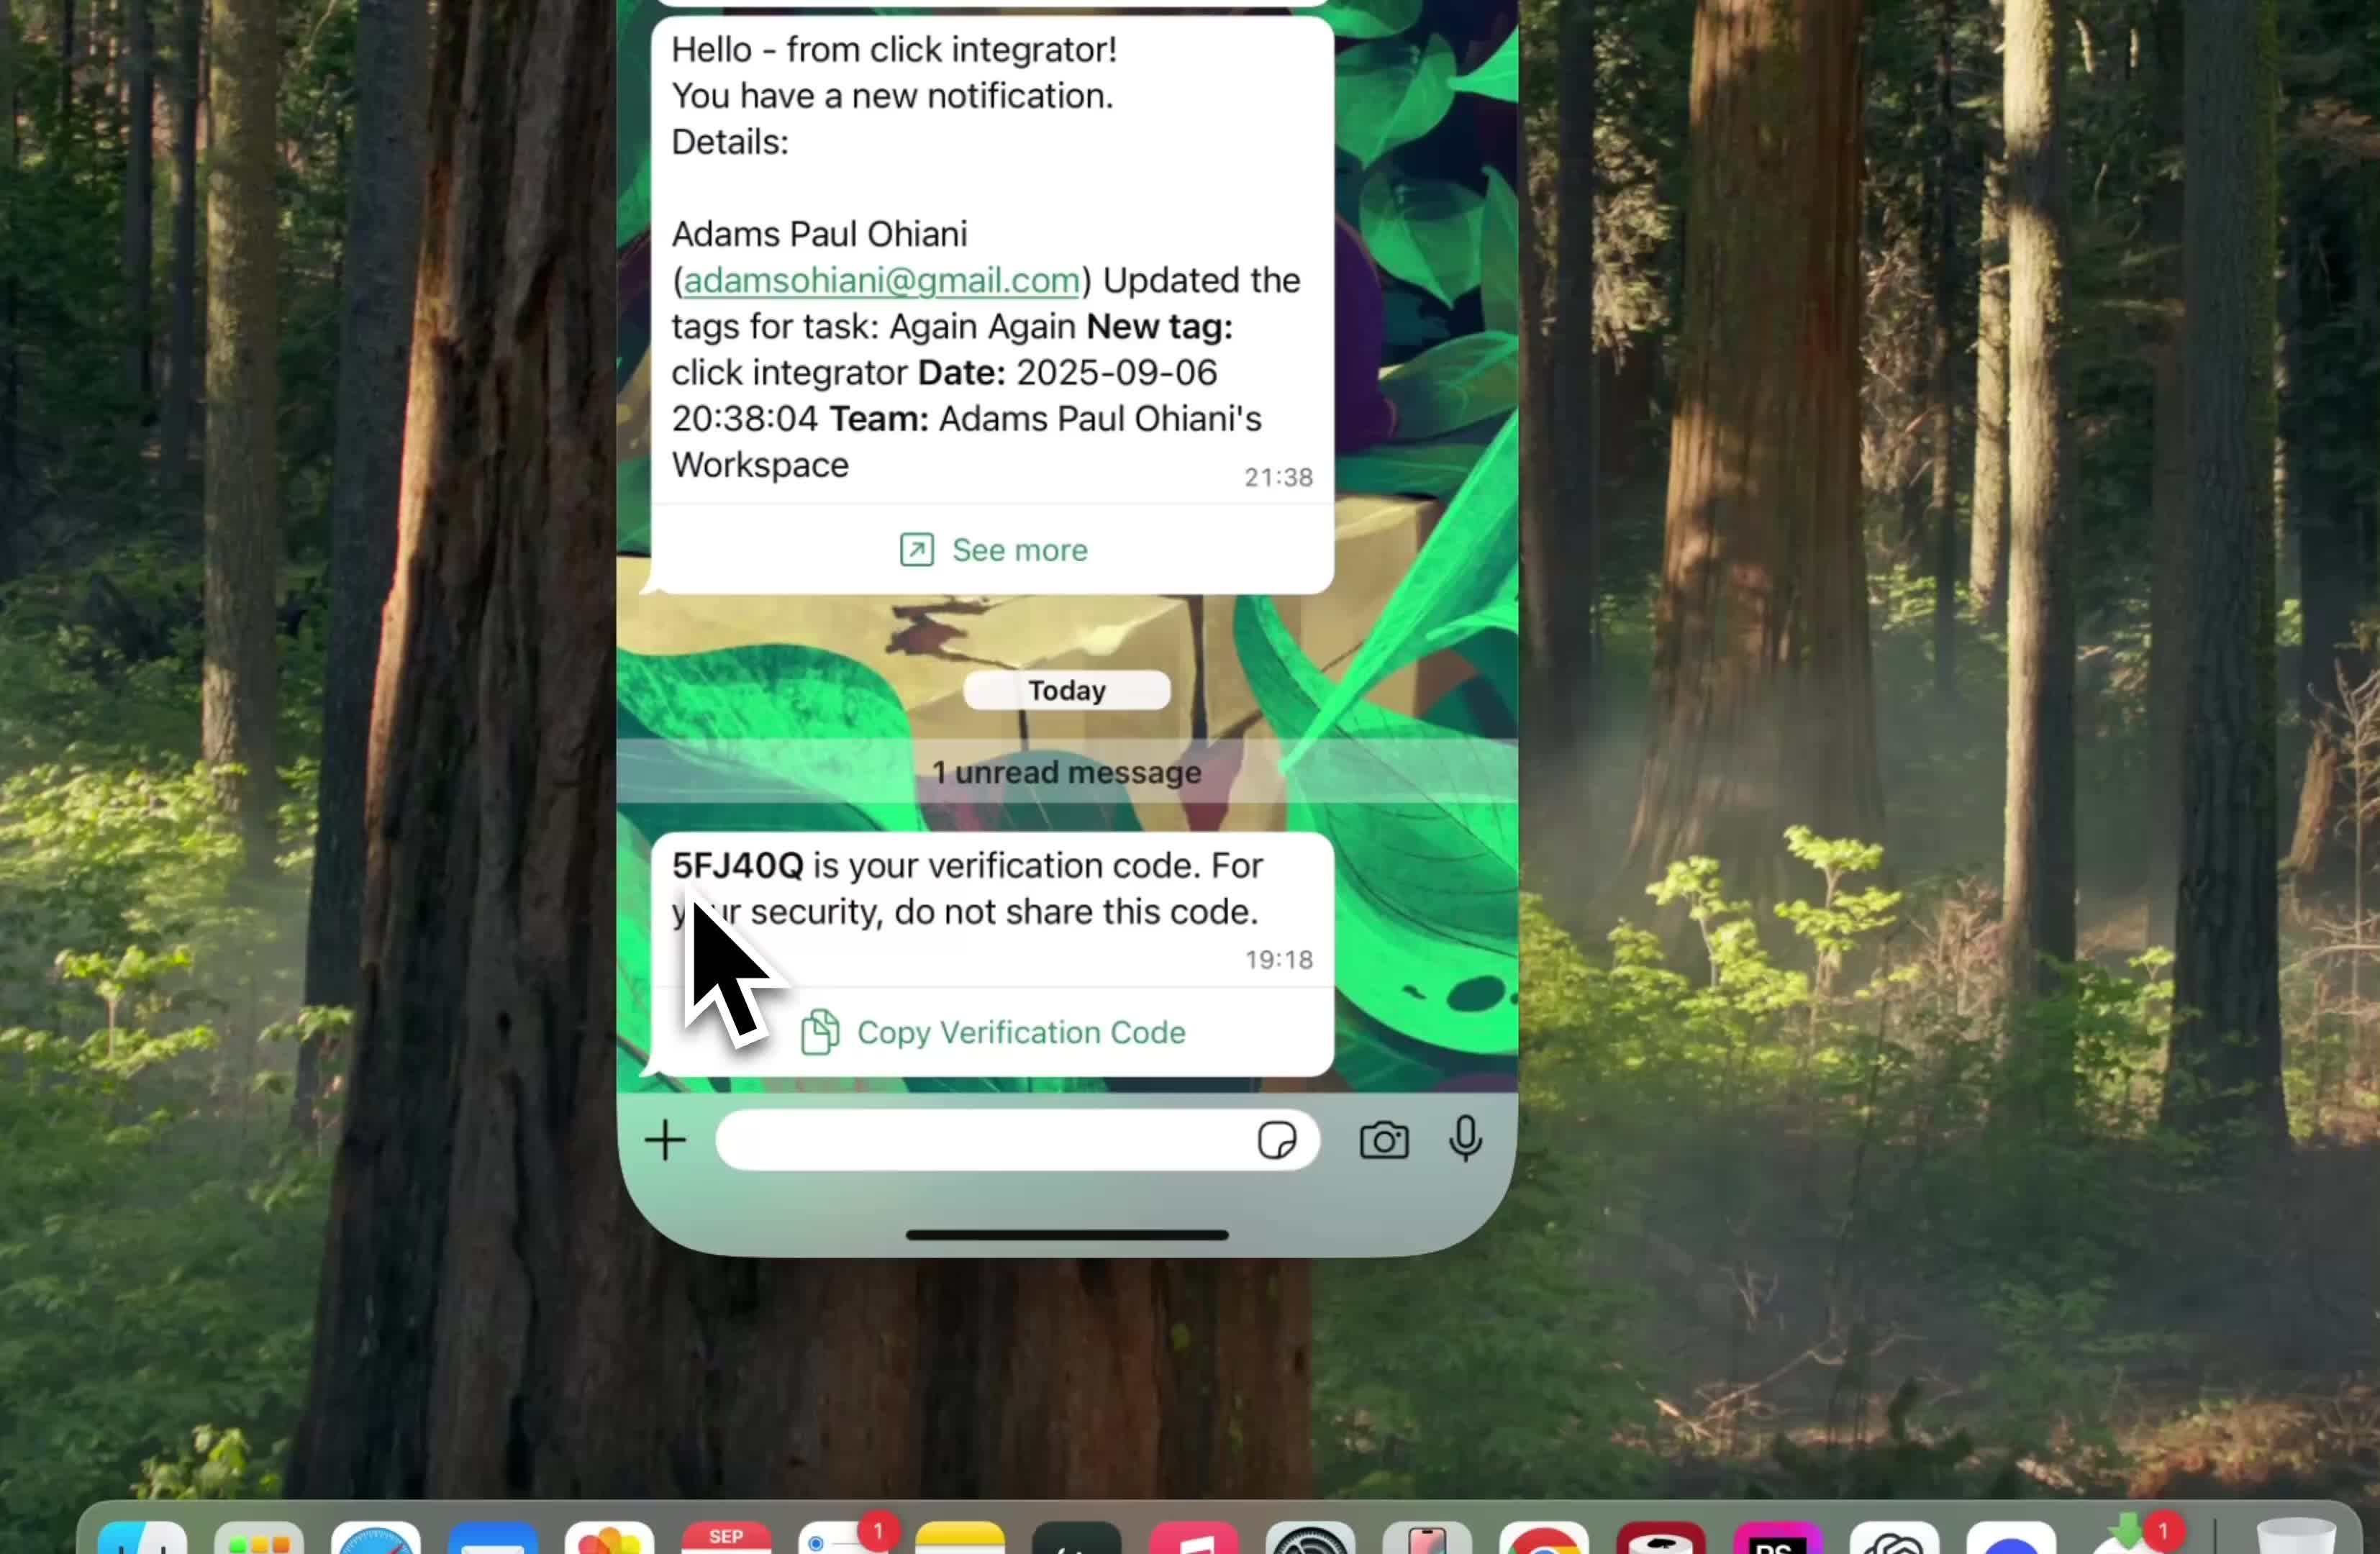
- Switch to WhatsApp on your phone.
- Open up the new message from ClickIntegrator.
- The code should look something like: 5FJ (this is just an example from the transcript).
Pro tip: ClickIntegrator often lets you copy this code directly (long-tap and select copy on your phone).
WhatsApp chat screenshot showing a verification code sent from ClickIntegrator.
Step 5: Pasting Your Verification Code into ClickIntegrator
Take that code and paste it back in the ClickIntegrator window in ClickUp.
“All you need to do is to paste the code here and connect. And then you see that automatically it is now connected to your WhatsApp.”
- Paste the code
- Click “Connect”
Just like that, you’ll see “Connected to WhatsApp” show up. That means you’re ready to go!
Confirmation popup: “You’re now connected to WhatsApp!”
Step 6: Reviewing Your Notification Options
Now that you’re connected, you’ll see a whole bunch of options in the notification settings.
- You can turn notifications on or off for when tags are created.
- You can choose to get updates about folders, lists, goals, and more.
- There’ll be toggle switches for each type of notification.
Take your time here! Choose what works for you (e.g., if you only care about goal updates, switch off the rest).
Visualization of toggle switches for notification preferences.
Example Notification Options
- Tags Created: On/Off
- List Changes: On/Off
- Folder Updates: On/Off
- Goal Key Results: On/Off
Personalize your notifications so your phone doesn’t blow up, but you never miss what matters.
Step 7: See It In Action! Real-time WhatsApp Notifications From ClickUp
Let’s say you just created a new tag in ClickUp. If you enabled the tag notification, in a few moments…
Give it a minute. Open your WhatsApp—there it is!
You might get more than one notification:
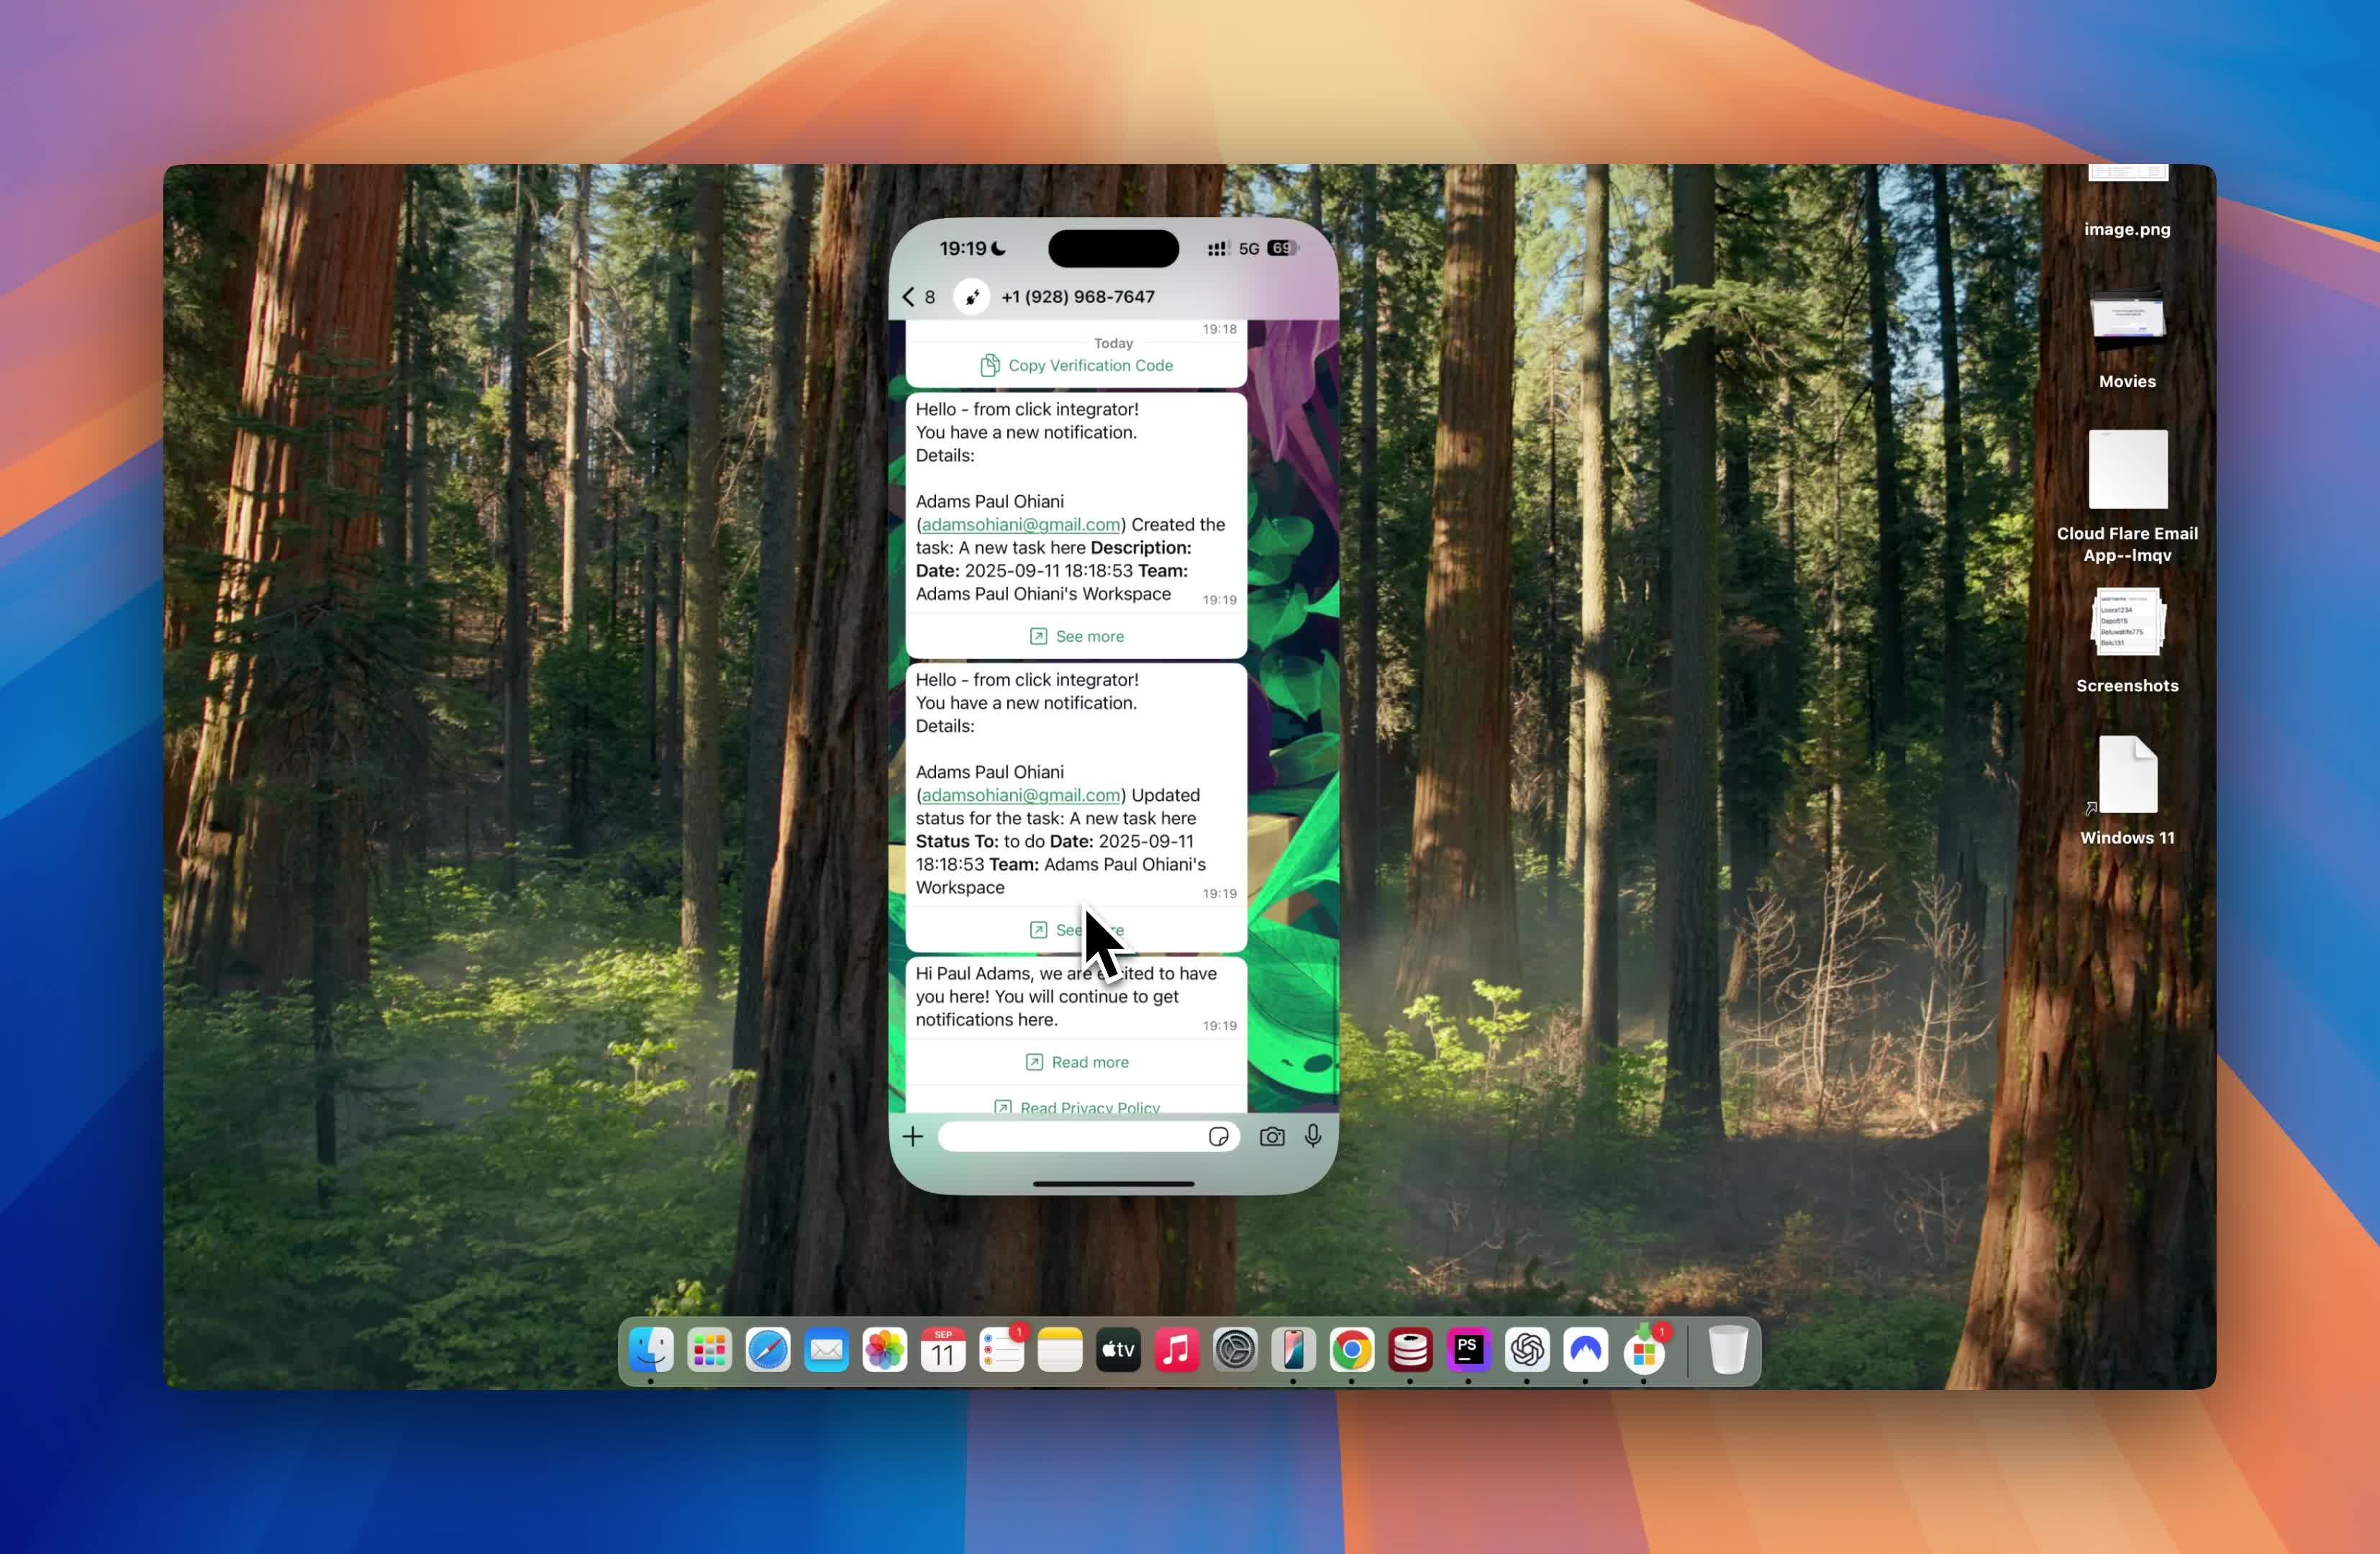
- The first one tells you a task was created.
- The second one might tell you a status changed (for instance, the task was set to “To Do”).
Pretty cool, right?
WhatsApp notification screenshots for “New Tag Created” and “Status Updated to To Do.”
Quick Note
One of the first things your WhatsApp will get is a “Welcome” notification, letting you know you’re all set to receive ClickUp updates.
Welcome message visual from ClickIntegrator on WhatsApp.
Tips for Customizing Your Notifications
ClickIntegrator lets you fine-tune your notification workflow so you’re not bombarded with updates you don’t need.
Here’s how to keep your phone happy:
- Disable unneeded notifications: Don’t care about tag updates? Toggle them off!
- Only crucial stuff: Enable only the folders, lists, or statuses you care about.
- Timing matters: Some notifications can be set for only work hours.
- Multiple devices: If you get WhatsApp on both phone and web, the notifications hit all devices—you’ll never miss a thing!
Pro Tip: Streamline Goal and Key-Result Alerts
Sometimes you don’t want every minor change cluttering your WhatsApp. Spend some time going through your ClickIntegrator options to keep things lean.
Visual showing options panel with toggles for selective notifications.
Troubleshooting & FAQs
Connecting tech tools always comes with a few common hiccups. Here’s how to get past them:
1. Didn’t get the verification code?
- Make sure your phone number is correct.
- Check your WhatsApp notifications—sometimes it’s in spam.
- Try sending again, or check if your WhatsApp has a working internet connection.
2. WhatsApp says “Not Connected” after entering code
- Double-check you pasted the right code.
- Restart your browser and try again.
- Make sure your ClickUp workspace has the correct permissions.
3. Too many notifications?
- Dive into notification settings and toggle off extras.
- Create custom filters for only urgent updates.
4. Can I connect more than one WhatsApp number?
- Usually, you can only link one WhatsApp number per ClickUp workspace, but some plugins (or team-level integrations) may let you add more. Check with your admin!
5. Can I disconnect later?
- Yes—just head back to ClickIntegrator settings and hit “Disconnect.”
Infographic: Common troubleshooting steps for WhatsApp integration.
Wrapping Up
Bringing WhatsApp and ClickUp together isn’t just a cool hack—it’s a total productivity upgrade. Now, you’re set to get real-time updates about your workspace, projects, new tags, goals, and status changes, without even opening your laptop.
Just to recap, here’s how you set it up:
- Open ClickUp and ClickIntegrator.
- Hit Connect, and enter your WhatsApp phone number.
- Get your code from WhatsApp, and paste it in ClickIntegrator.
- Set up your notification preferences.
- Enjoy instant notifications about your lists, tasks, folders, and more!
Make sure to experiment with notification settings so your workspace is as chill or as active as you want.
That’s it! If you’ve followed this guide, your notifications are about to get a whole lot smarter. Drop any questions in the comments below—we’re here to help every step of the way.
Happy clicking and chatting!
Click integrator has been carefully crafted to work with any click up account
Frequently Asked Questions
How secure is my data?
Your connection data is heavily encrypted
Can I request for custom apps?
Yes! kindly send an email to [email protected]
Is this app affiliated to click up?
No, this app was created to solve the problem of connecting apps to click up
How long is the free trial?
The free trial is only available for 3 days
Do I need my credit card for the free trial?
No, you do not need a credit card for the free trial
Can I export from click up to other apps?
Yes! you can export from click up to other connected apps